How To Reset Hisense TV [Android, VIDAA, & Roku]
To factory reset, Hisense TV, open the Support option from the main Menu and select Self Diagnosis. Scroll down and choose Reset. Enter the pin code, and your device will start resetting. It will take a few minutes and then reboot to complete the process.
Being a Hisense TV user, I faced a reboot loop problem a month ago. While searching for its solution, I found there are some common issues Hisense television users are facing like:
- TV restarting automatically
- Audio without picture
- Brightness problems or screen goes black
- TV not responding to remote properly
For all the above mentioned issues, one quick fix is to reset your Hisense smart TV. Restoring TV to default settings brings the device to its original factory state, and all the problems are fixed.
How To Factory Reset Hisense TV
The method to perform a factory reset on Hisense smart, android, and Roku TV is different. We are going to cover each of them in detail, let’s get straight into it:
- Switch ON your Hisense Smart TV.
- Now, press the “MENU” button on your Hisense Smart TV remote.
- From the drop-down menu, select the “SUPPORT” and press the “OK or ENTER” button.
Note: Some Hisense TV models have the “ENTER” button while others have “OK” or “SELECT” button. So, whichever your TV remote has, it’ll do the same job.
- After entering the “SUPPORT” menu, choose the “SELF DIAGNOSIS” option.
- Another menu will appear on your screen. Here you need to select the “RESET” option.
- You will be asked to enter the security pin. (if you don’t have a pin set on your Hisense TV, enter 0000 as the default reset code).
- Lastly, wait for a couple of minutes to complete the process. Your TV is restored to its default settings and set it up as per your requirements.
A factory reset will remove all the downloaded information, settings, and Wi-Fi passwords will be lost. So, it is recommended to only go for a factory reset once you have tried the soft reset.
If your TV is not responding to the remote control or has a black or blue screen of death, you must check how to reset Hisense TV without a remote.
Resetting Hisense Android TV
The first method will not work if you have Hisense Android TV, for that you need to follow this method:
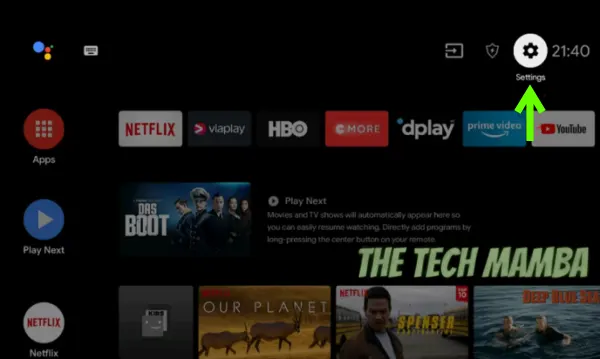
- Press the “UPWARD” arrow key on the remote control to open the control panel. Scroll right, select Settings, and press the “OK” button.
- Now, from the drop-down menu, select the “Device Preferences” option.
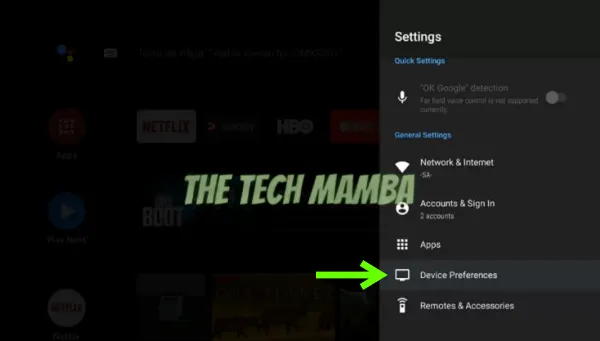
Note: In some Hisense Android TVs, the Device Preferences option is not present, so if that’s the case, select the “Storage and Reset” option.
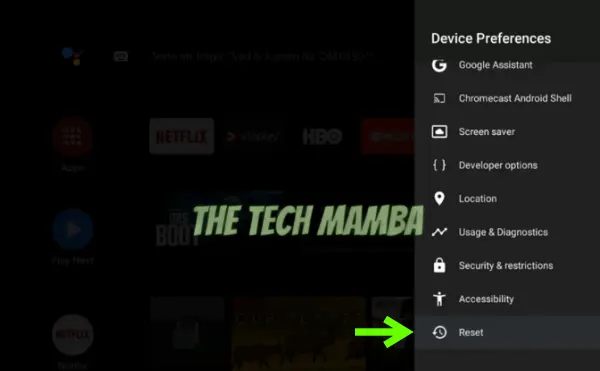
- From the next menu, scroll all the way down until you see the “RESET” option, select it, and press “OK”.
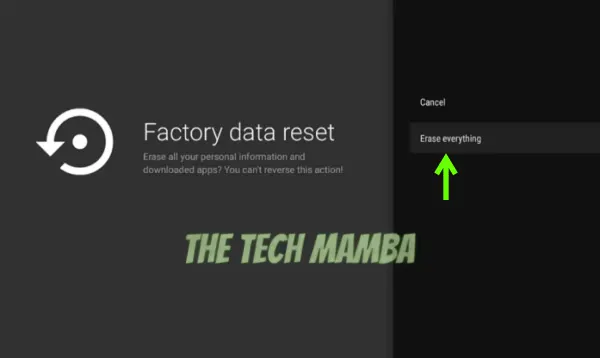
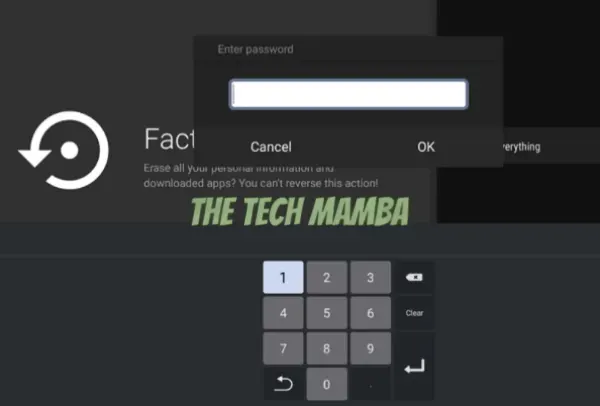
- A warning message will appear on your screen “This will erase all data from your device’s internal storage.” You need to again select “RESET” and press the OK button.

- Next, select the “Erase Everything” option.
- If you have set a pin code on your device, it will ask you to enter the code.
- With this, your Hisense TV will restore to its default settings.
NOTE: It will take anywhere between 5 to 10 minutes to complete, depending upon the data stored on TV.
Hard Resetting Hisense Roku TV
- Press the “HOME” button on the Hisense Roku TV remote to open the “MENU”.
- Scroll down in the menu and open “SETTINGS” by pressing the right arrow key on the remote.
- Again scroll down till you see the “SYSTEM” option, press the right arrow key on the remote to open it.
- Go all the way down and open “ADVANCED SYSTEM SETTINGS” by pressing the right arrow key.
In advanced system settings, you will find the option “FACTORY RESET”. In this section, you will have two reset options.
Reset TV audio/picture settings 2. Factory reset everything. - Option 1 will restore picture and audio settings to default values without removing the Roku account and installed channels.
- Option 2 will remove all the downloaded data and settings from your Roku TV.
Soft Resetting Methods
There are three ways to soft reset Hisense smart TV, and we will share with you all of them. Here’s what you need to do:
Method # 1
- If your Hisense TV is turned on, unplug the AC adapter from the power socket.
- Now, let it stay like that for at least ten minutes.
- After 10 minutes, press the “POWER” button on your Hisense TV and hold it down for 60 seconds.
- Lastly, plug the adapter back in the electric socket, while still holding down the “POWER” button, and turn the TV on.
- If this doesn’t work in the first go, repeat it at least one more time after a few minutes.
Method #2
- Locate the button panel on your Hisense TV.
- Now, press the “VOLUME UP” and “INPUT” or “MENU” buttons simultaneously.
- Keep holding these buttons down and, at the same time, press the “POWER” button as well and release it after five seconds.
- After that, release the rest of the buttons as well.
Method # 3
- In this method, you need to press the “MENU/INPUT” and “VOLUME DOWN” buttons together and hold them down.
- While still holding down the two buttons, press the “POWER” button and hold it down as well.
- Now, wait until the blue light shows on your Hisense TV screen. (Don’t release the buttons yet).
- Wait for ten seconds and release all three buttons. This will force reboot your Hisense TV.
- A picture will show up on your TV screen, which means the reset has been completed.
You may also like to check:
- How To Reset Hisense TV Without Remote
- Where Is The Reset Button On Hisense TV
- How To Connect Hisense TV To WiFi Without Remote
Final Words
These methods to factory reset your TV can help fix almost all the issues such as lagging, color or sound issues, black screen, flickering screen, and other issues related to Hisense TV firmware. We hope that it will help you fix the problem you are facing with your TV. If the given methods didn’t work for you feel free to write us in the comments or you can contact Hisense customer support.